• Contact
  • Homelab
Dimitris Tonias
  • Management
  • Monitoring
  • Cloud
  • Virtualization
  • Networking
  • Productivity
No Result
View All Result
  • Management
  • Monitoring
  • Cloud
  • Virtualization
  • Networking
  • Productivity
No Result
View All Result
Dimitris Tonias
No Result
View All Result

Seize FSMO roles on a Domain Controller

Dimitris Tonias by Dimitris Tonias
January 21, 2018 - Updated on April 21, 2024
in Management
Reading Time: 2 mins read
A A
2
Share on FacebookShare on Twitter

The process of transferring one or more FSMO roles from one Domain Controller to another is a fairly easy process. However, given that all DCs are online and are functioning properly.

What happens if a DC, which already has an FSMO role, crashes or shuts down for a long time? FSMO role transfer cannot be completed as the server is no longer online.

For similar cases, we use a forced transfer of FSMO roles, a process that is referred as ‘seize’. Seizing FSMO roles from a non-functional DC is the last solution to the problem and means that the DC will not come back into operation without reinstalling it.

Even if you can restore it (eg after a crash), if you have seized its roles, then it should not come back to the network because it will cause even more problems in the existing infrastructure.

The FSMO roles can be seized by either PowerShell or NTDSUtil as you will see below.

To seize the RID Master, PDC Emulator, and Infrastructure Master roles, you will need to log in to DC with Domain Administrator privileges. For Schema Master and Domain Naming Master roles, you must have Schema Admin and Enterprise Admin permissions respectively.

Seize FSMO roles using PowerShell

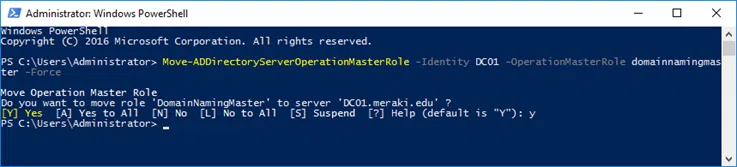
The command we use is the same we use for the simple transfer, except that we need to add the -Force switch.

So, for example, to seize the Naming Master role, use the following command.

Move-ADDirectoryServerOperationMasterRole -Identity <TargetDC> -OperationMasterRole domainnamingmaster -Force

Move-ADDirectoryServerOperationMasterRole -Identity <TargetDC> -OperationMasterRole domainnamingmaster -Force

Where in the -OperationMasterRole switch you can declare one or more FSMO roles separated by a comma (,). For example:

-OperationMasterRole schemamaster, domainnamingmaster, pdcemulator, ridmaster, infrastructuremaster

-OperationMasterRole schemamaster, domainnamingmaster, pdcemulator, ridmaster, infrastructuremaster

Seize FSMO roles on a Domain Controller

Seize FSMO roles using the NTDSUtil tool

First, open the command prompt with administrative privileges.

Type ntdsutil and press Enter.
Type roles and press Enter.
Type connections and press Enter.
Type connect to server DC01 and press Enter, where DC01 type the server computer name to transfer the FSMO roles to.
Type quit and press Enter.

Then, we will seize the FSMO roles one by one with the corresponding command, as the case may be. After each Enter appears a confirmation window. Just click Yes to continue.

Also, to mention that, during the seize process, NTDSUtil tries to make a simple transfer first (which obviously fails) and then proceeds to the forcible transfer.

For the Schema Master role, type seize schema master and press Enter.
For the Domain Naming Master role, type seize naming master and press Enter.
For the RID Master role, type seize rid master and press Enter.
For the PDC Emulator role, type seize pdc and press Enter.
For the Infrastructure Master role, type seize infrastructure master and press Enter.

Seize FSMO roles on a Domain Controller

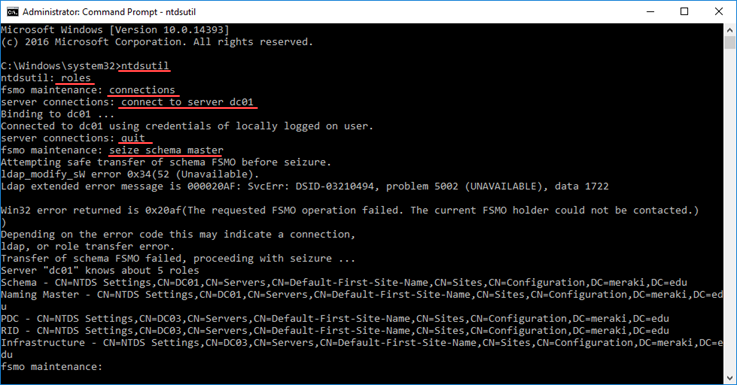
Finally, type quit to exit the NTDSUtil environment.

Tags: Domain ControllerFSMONTDSUtilPowerShellWindows Server 2016
ShareTweetPin
Previous Post

Transfer FSMO roles to another Domain Controller

Next Post

Offline domain join in Active Directory

Related Posts

Approve updates in WSUS 2016
Management

Approve updates in WSUS 2016

Configure Group Policy to deploy updates using WSUS 2016
Management

Configure Group Policy to deploy updates using WSUS 2016

Configure computer groups in WSUS 2016
Management

Configure computer groups in WSUS 2016

The initial configuration of WSUS 2016
Management

The initial configuration of WSUS 2016

Install WSUS in Windows Server 2016
Management

Install WSUS in Windows Server 2016

Error opening Report Viewer on WSUS 2016
Management

Error opening Report Viewer on WSUS 2016

Comments 2

  1. Elias Mdao says:
    4 years ago

    Hello

    Your article is very nice but am getting this error
    RPC server unavailable

    Reply
  2. Pankaj says:
    2 years ago

    thanks issue resolved

    Reply

Leave a Reply Cancel reply

Your email address will not be published. Required fields are marked *

No Result
View All Result
Zabbix server: More than 75% used in the trends cache
Monitoring

Zabbix server: More than 75% used in the trends cache

In Zabbix, "trends" are a type of data storage representing aggregated historical data. Zabbix monitors and collects a vast amount...

Read moreDetails
Check word count on Google Docs

Check word count on Google Docs

Zabbix server: More than 75% used in the configuration cache

Zabbix server: More than 75% used in the configuration cache

Approve updates in WSUS 2016

Approve updates in WSUS 2016

Configure Group Policy to deploy updates using WSUS 2016

Configure Group Policy to deploy updates using WSUS 2016

Configure computer groups in WSUS 2016

Configure computer groups in WSUS 2016

The initial configuration of WSUS 2016

The initial configuration of WSUS 2016

Get more stuff

Subscribe to our mailing list and get interesting stuff and updates to your email inbox.

Thank you for subscribing.

Something went wrong.

we respect your privacy and take protecting it seriously

  • Contact
  • Homelab

© 2024 Dimitris Tonias

No Result
View All Result
  • About
  • Contact
  • Free Tools
  • Home
  • Homelab

© 2024 Dimitris Tonias

This website uses cookies. By continuing to use this website you are giving consent to cookies being used.