• Contact
  • Homelab
Dimitris Tonias
  • Management
  • Monitoring
  • Cloud
  • Virtualization
  • Networking
  • Productivity
No Result
View All Result
  • Management
  • Monitoring
  • Cloud
  • Virtualization
  • Networking
  • Productivity
No Result
View All Result
Dimitris Tonias
No Result
View All Result

Add computers to TrustedHosts list using PowerShell

Dimitris Tonias by Dimitris Tonias
December 20, 2017 - Updated on April 21, 2024
in Management
Reading Time: 2 mins read
A A
3
Share on FacebookShare on Twitter

When you need to enable remote management of a computer or server through WinRM (Windows Remote Management), especially in a Workgroup environment, you should first add computers to the TrustedHosts list. Otherwise, you may most likely encounter errors when communicating between the two sides.

Using PowerShell, you can see what the current records are in the TrustedHosts file but also how to add new records depending on your scenario. You will need to be a member of the Administrators group and run PowerShell commands with administrator rights to make changes to the file.

Add computers to TrustedHosts list using PowerShell

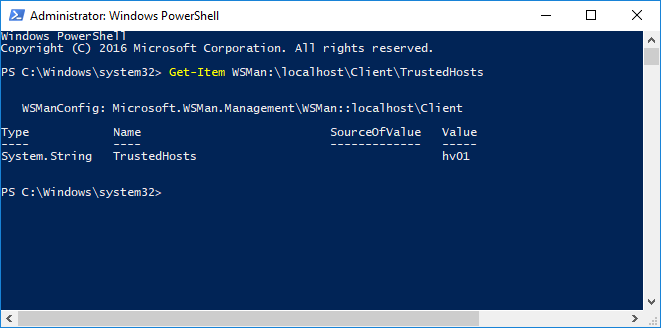
View the computers of TrustedHosts list

To view the list of TrustedHosts added to the machine, type the following command. By default, its value is blank.

Get-Item WSMan:\localhost\Client\TrustedHosts

Get-Item WSMan:\localhost\Client\TrustedHosts

Add all computers to the TrustedHosts list

Using the Set-Item cmdlet and the wildcard you can add all the computers to the TrustedHosts list with the following command.

Set-Item WSMan:\localhost\Client\TrustedHosts -Value *

Set-Item WSMan:\localhost\Client\TrustedHosts -Value *

Add all domain computers to the TrustedHosts list

In the following command, replace .yourdomain.com with your own domain name.

Set-Item WSMan:\localhost\Client\TrustedHosts *.yourdomain.com

Set-Item WSMan:\localhost\Client\TrustedHosts *.yourdomain.com

Add specific computers to the TrustedHosts list

You can add specific computers you choose based on their hostname by separating them with a comma (,) using the following command.

Set-Item WSMan:\localhost\Client\TrustedHosts -Value <ComputerName>,[<ComputerName>]

Set-Item WSMan:\localhost\Client\TrustedHosts -Value <ComputerName>,[<ComputerName>]

Where ComputerName can be in the Server01 or Server01.yourdomain.com format

Add a computer to an existing list of TrustedHosts

If you have already added some computers to the TrustedHosts list and want to add an additional computer, without deleting the previous entries, you should use the following method. This is because the TrustedHosts list is updated based on the last Set-Item command you have run overwriting the previous entries.

Use the following command to save the current TrustedHosts computer list to a curList variable.

$curList = (Get-Item WSMan:\localhost\Client\TrustedHosts).value

$curList = (Get-Item WSMan:\localhost\Client\TrustedHosts).value

To add a computer to the current list, type the following command by specifying both the variable you created and the computer name you are going to add.

Set-Item WSMan:\localhost\Client\TrustedHosts -Value "$curList, Server01"

Set-Item WSMan:\localhost\Client\TrustedHosts -Value "$curList, Server01"

Alternatively, to avoid using a variable, add the -Concatenate switch to the Set-Item command to add both new and previous entries. For example:

Set-Item WSMan:\localhost\Client\TrustedHosts -Concatenate -Value Server02

Set-Item WSMan:\localhost\Client\TrustedHosts -Concatenate -Value Server02

Add computers to the TrustedHosts list using the IP address

Similarly to the previous commands, you can use an IPv4 or IPv6 address. In the case of IPv6, you have to type the address between [].

Set-Item WSMan:\localhost\Client\TrustedHosts -Value 10.10.10.1,[0:0:0:0:0:0:0:0]

Set-Item WSMan:\localhost\Client\TrustedHosts -Value 10.10.10.1,[0:0:0:0:0:0:0:0]

That’s it!

Tags: PowerShellTrustedHostsWindows Server 2016
ShareTweetPin
Previous Post

Use PowerShell to unblock files on Windows

Next Post

Change network type using PowerShell in Windows Server 2016

Related Posts

Approve updates in WSUS 2016
Management

Approve updates in WSUS 2016

Configure Group Policy to deploy updates using WSUS 2016
Management

Configure Group Policy to deploy updates using WSUS 2016

Configure computer groups in WSUS 2016
Management

Configure computer groups in WSUS 2016

The initial configuration of WSUS 2016
Management

The initial configuration of WSUS 2016

Install WSUS in Windows Server 2016
Management

Install WSUS in Windows Server 2016

Error opening Report Viewer on WSUS 2016
Management

Error opening Report Viewer on WSUS 2016

Comments 3

  1. brett says:
    7 years ago

    I tried to do this by IP, and it appears to connect but then I get a dialog “Enable Delegation of User Credentials” to machine.router.name”

    Hitting yes doesn’t do anything and hitting no I get the usual cant connect error.

    Reply
  2. Austen says:
    5 years ago

    Hello!
    I’m running windows server 2008 R2, powershell 5.1
    I was unable to use the ip method without enclosing the list of ip addresses in quotes.

    Reply
  3. Dave says:
    4 years ago

    Mate thank for this. I have been trying for a couple of days to do this and two minutes after seeing your article up and running.

    Reply

Leave a Reply Cancel reply

Your email address will not be published. Required fields are marked *

No Result
View All Result
Zabbix server: More than 75% used in the trends cache
Monitoring

Zabbix server: More than 75% used in the trends cache

In Zabbix, "trends" are a type of data storage representing aggregated historical data. Zabbix monitors and collects a vast amount...

Read moreDetails
Check word count on Google Docs

Check word count on Google Docs

Zabbix server: More than 75% used in the configuration cache

Zabbix server: More than 75% used in the configuration cache

Approve updates in WSUS 2016

Approve updates in WSUS 2016

Configure Group Policy to deploy updates using WSUS 2016

Configure Group Policy to deploy updates using WSUS 2016

Configure computer groups in WSUS 2016

Configure computer groups in WSUS 2016

The initial configuration of WSUS 2016

The initial configuration of WSUS 2016

Get more stuff

Subscribe to our mailing list and get interesting stuff and updates to your email inbox.

Thank you for subscribing.

Something went wrong.

we respect your privacy and take protecting it seriously

  • Contact
  • Homelab

© 2024 Dimitris Tonias

No Result
View All Result
  • About
  • Contact
  • Free Tools
  • Home
  • Homelab

© 2024 Dimitris Tonias

This website uses cookies. By continuing to use this website you are giving consent to cookies being used.