• Contact
  • Homelab
Dimitris Tonias
  • Management
  • Monitoring
  • Cloud
  • Virtualization
  • Networking
  • Productivity
No Result
View All Result
  • Management
  • Monitoring
  • Cloud
  • Virtualization
  • Networking
  • Productivity
No Result
View All Result
Dimitris Tonias
No Result
View All Result

How to configure network settings in Windows Server 2016

Dimitris Tonias by Dimitris Tonias
December 18, 2017 - Updated on April 21, 2024
in Management
Reading Time: 4 mins read
A A
0
Share on FacebookShare on Twitter

Configuring network settings is one of the first steps you will need to take on Windows Server 2016. Whether you are using the GUI or Core version, changing the IP address, Subnet Mask, Default Gateway, and DNS Servers can be done in different ways depending on the case.

In today’s article, you will see how to change the basic IPv4 network settings for your machine’s adapters using the GUI, PowerShell, SConfig, and command prompt.

Configure network settings using the graphical user interface

Ok, the process is more than simple, but I mention it to make the article more complete.

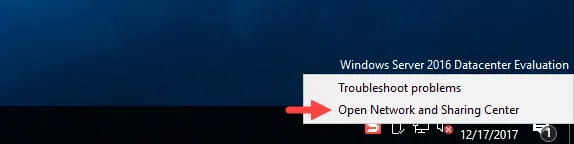
Right-click the network icon in the notification area, and then click Open Network and Sharing Center.

How to configure network settings in Windows Server 2016

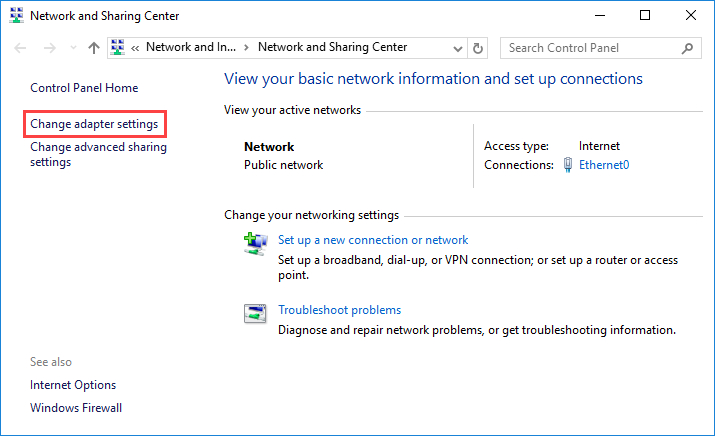
In the window that opens, click Change adapter settings to display the available network adapters of the machine.

How to configure network settings in Windows Server 2016

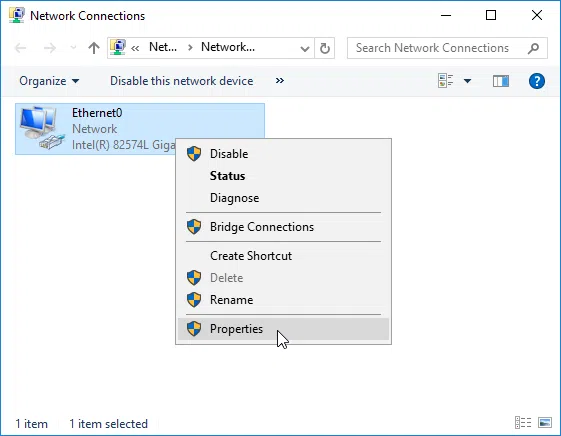
Right-click the adapter you are about to change the IP settings and then click Properties.

How to configure network settings in Windows Server 2016

Click Internet Protocol Version 4 (TCP / IPv4) and then the Properties button.

How to configure network settings in Windows Server 2016

Here, enable Use the following IP address and enter the static IP addresses for the server, subnet mask, default gateway and DNS servers.

How to configure network settings in Windows Server 2016

That’s it!

Configure network settings using PowerShell

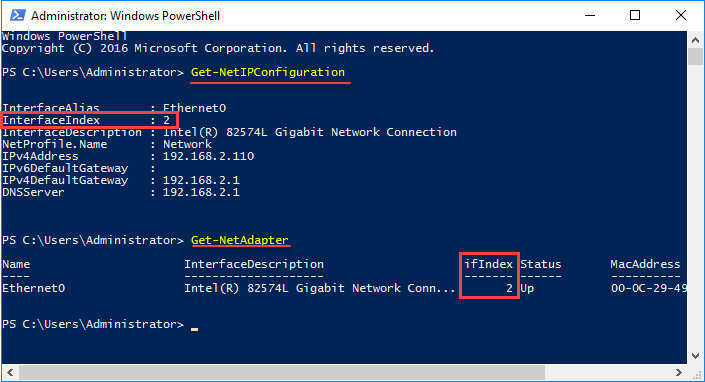
First, we need to identify the InterfaceIndex number for the network adapter we want and then based on that, we will proceed to set it up.

By typing the Get-NetIPConfiguration cmdlet you can see the current IP settings of all the network adapters of the machine. Note the InterfaceIndex.

Alternatively, type the Get-NetAdapter cmdlet to see the available network adapters. Note the number again in ifIndex.

How to configure network settings in Windows Server 2016

To set the IP address, the Subnet (PrefixLength) and the Default Gateway, type the following command by changing the addresses according to your own network.

New-NetIPAddress -InterfaceIndex 2 -IPAddress 192.168.2.100 -PrefixLength 24 -DefaultGateway 192.168.2.1

New-NetIPAddress -InterfaceIndex 2 -IPAddress 192.168.2.100 -PrefixLength 24 -DefaultGateway 192.168.2.1

To set up DNS servers, use the following Set-DnsClientServerAddress command.

Set-DnsClientServerAddress -InterfaceIndex 2 -ServerAddresses 192.168.2.10, 192.168.2.11

Set-DnsClientServerAddress -InterfaceIndex 2 -ServerAddresses 192.168.2.10, 192.168.2.11

You can use the Get-NetIPConfiguration cmdlet again to confirm that it has declared the correct settings.

Configure network settings using the SConfig tool

For a more interactive process, you can use the SConfig tool through PowerShell. Type SConfig and press Enter.

How to configure network settings in Windows Server 2016

To change the network settings, type the number 8 that corresponds to Network Settings.

Type the index number of the adapter you want to set up.

How to configure network settings in Windows Server 2016

Then use Options 1 and 2 to set the IP address, Subnet Mask, Default Gateway, and the adapter’s DNS servers. I do not think I need to go further into this piece, it’s pretty easy and intuitive.

How to configure network settings in Windows Server 2016

Configure network settings using the Command Prompt

In this case, we will use the netsh command.

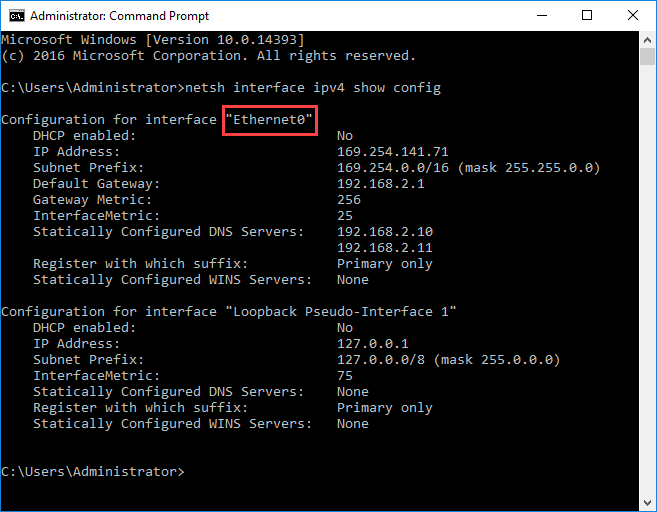
First, run the following command to note the name of the adapter you are going to set up. In our case is Ethernet0.

netsh interface ipv4 show config

netsh interface ipv4 show config

How to configure network settings in Windows Server 2016

To change your IP address, Subnet Mask and Default Gateway, type the following command by changing the addresses according to your own settings.

netsh interface ipv4 set address name = "INTERFACE NAME" static IP_ADDRESS SUBNET_MASK GATEWAY

netsh interface ipv4 set address name = "INTERFACE NAME" static IP_ADDRESS SUBNET_MASK GATEWAY

For example, it will be something like this.

netsh interface ipv4 set address name = "Ethernet0" static 192.168.2.100 255.255.255.0 192.168.2.1

netsh interface ipv4 set address name = "Ethernet0" static 192.168.2.100 255.255.255.0 192.168.2.1

Next, to configure the Primary DNS Server, use the following command.

netsh interface ipv4 set dns name = "INTERFACE NAME" static DNS_SERVER

netsh interface ipv4 set dns name = "INTERFACE NAME" static DNS_SERVER

For example, it will be something like this.

netsh interface ipv4 set dns name = "Ethernet0" static 192.168.2.10

netsh interface ipv4 set dns name = "Ethernet0" static 192.168.2.10

To configure the Secondary DNS Server, use the following command.

netsh interface ipv4 set dns name = "INTERFACE NAME" static DNS_SERVER index = 2

netsh interface ipv4 set dns name = "INTERFACE NAME" static DNS_SERVER index = 2

Similarly to the previous example.

netsh interface ipv4 set dns name = "Ethernet0" static 192.168.2.11 index = 2

netsh interface ipv4 set dns name = "Ethernet0" static 192.168.2.11 index = 2

Finally, you can use the first command again to confirm that your settings are correct.

Tags: Command PromptNetworkPowerShellWindows Server 2016
ShareTweetPin
Previous Post

Disable Firewall in Windows Server 2016

Next Post

Install .NET Framework 3.5 on Windows Server 2016

Related Posts

Approve updates in WSUS 2016
Management

Approve updates in WSUS 2016

Configure Group Policy to deploy updates using WSUS 2016
Management

Configure Group Policy to deploy updates using WSUS 2016

Configure computer groups in WSUS 2016
Management

Configure computer groups in WSUS 2016

The initial configuration of WSUS 2016
Management

The initial configuration of WSUS 2016

Install WSUS in Windows Server 2016
Management

Install WSUS in Windows Server 2016

Error opening Report Viewer on WSUS 2016
Management

Error opening Report Viewer on WSUS 2016

Leave a Reply Cancel reply

Your email address will not be published. Required fields are marked *

No Result
View All Result
Zabbix server: More than 75% used in the trends cache
Monitoring

Zabbix server: More than 75% used in the trends cache

In Zabbix, "trends" are a type of data storage representing aggregated historical data. Zabbix monitors and collects a vast amount...

Read moreDetails
Check word count on Google Docs

Check word count on Google Docs

Zabbix server: More than 75% used in the configuration cache

Zabbix server: More than 75% used in the configuration cache

Approve updates in WSUS 2016

Approve updates in WSUS 2016

Configure Group Policy to deploy updates using WSUS 2016

Configure Group Policy to deploy updates using WSUS 2016

Configure computer groups in WSUS 2016

Configure computer groups in WSUS 2016

The initial configuration of WSUS 2016

The initial configuration of WSUS 2016

Get more stuff

Subscribe to our mailing list and get interesting stuff and updates to your email inbox.

Thank you for subscribing.

Something went wrong.

we respect your privacy and take protecting it seriously

  • Contact
  • Homelab

© 2024 Dimitris Tonias

No Result
View All Result
  • About
  • Contact
  • Free Tools
  • Home
  • Homelab

© 2024 Dimitris Tonias

This website uses cookies. By continuing to use this website you are giving consent to cookies being used.