Once you have completed the Sysprep process and the source computer is now switched off you can proceed to the next step, which is capturing the Windows 7 image.
First connect an external hard drive to the USB port of your computer. Then, boot the computer and enter the BIOS setup to set the first boot device to CD / DVD or USB if you installed your WinPE disk on a thumb drive. Ensure your WinPE CD/DVD or thumb drive is inserted so it runs once you leave the BIOS settings.
When you start the computer press a button to start from the CD when you see the corresponding message.
Immediately after the Windows files have automatically loaded, your computer will open the WinPE command prompt. You’re now ready to proceed to capture the image.
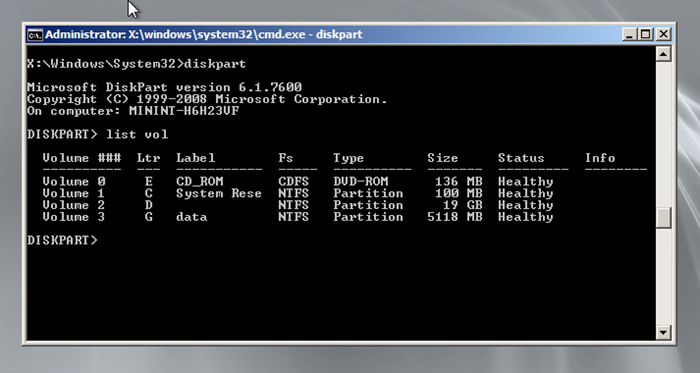
At this point you need to find out which drive letters Windows has mapped to the WinPE disk, the computer’s internal hard drive and the external drive plugged into the USB port. The Diskpart tool can help you identify the connected drives of your computer.
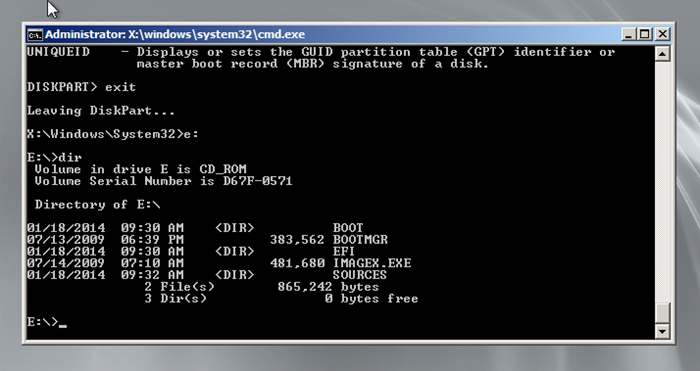
You can start by looking separately at each drive letter’s corresponding files – that will help you identify what’s installed on each drive. For example, type c: and then the dir command to see the list of folders held on the drive.
To identify the WinPE disc, look for a file called imagex.exe after you hit the dir command for each disk.
To identify the disk which runs Sysprep (usually c: \ or d:\) navigate to the location D:\Windows\ System32\Sysprep using the command cd (change directory), then run the dir command and make sure that this folder contains the file Sysprep_succeeded.tag.
Then you need to find the external hard drive plugged into the USB port on which we’ll save the image of the operating system. Obviously, you can skip the disk letters that have already been recognized as the WinPE disk and Sysprep.
For your convenience you can note the drive letter assignments so you know them when you need to type subsequent commands to save the image. So, in my example, the disks are as follows:
- D:\ – The hard drive on to which Sysprep has been applied
- E:\ – The WinPE disk with imagex.exe
- G:\ – The external USB drive which will store the image file
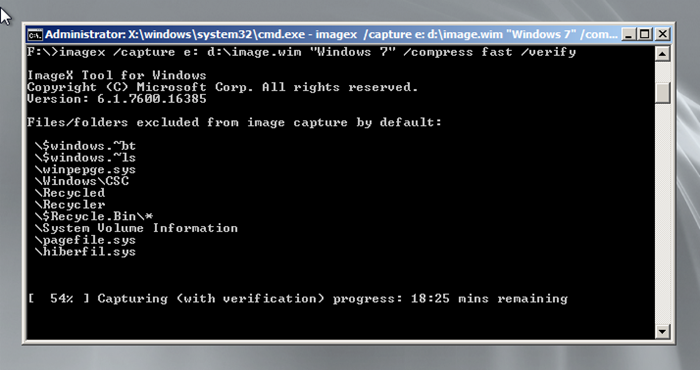
Now, access the disk that contains the WinPE disk (and imagex.exe file) by entering the corresponding letter on the command line. (In my example is the drive e:\) To save the Sysprep prepared image, type the following command:
imagex /capture d: g:\image.wim “Windows 7” /compress fast /verify
General command syntax
imagex /capture Source-drive Destination-file “Image Description” /compress fast /verify
Where:
- D: is the drive on which Sysprep has been applied
- G:\image.wim is the exact path to resulting image file with a name that you can choose yourself. Here we chose the filename image.wim. The file must have the suffix .wim
- “Windows 7” is a description of the image file. You can provide your own description to identify it easily.
- /Compress is a switch which is necessary to compress the image file
- Fast is a switch for faster image acquisition
- /Verify this switch is not necessary but it is advisable to use it to verify the saved image file.
Capturing the Sysprep image will take a long time until it completes, depending on the updates, applications and data stored.
After the capture has been completed, the system image will be stored on the external hard drive.
You can now reboot your source computer and continue to use it.


