In this guide you will learn how to apply the Windows 7 image to a new computer using the WinPE disk you have already created and the image file you have captured. This is actually the last step of the Windows 7 Thick Image Deployment.
What you’ll need
- The WinPE disk you have created
- The Windows 7 image file you captured
- The computer / client on to which the Windows 7 image will be installed
Booting from the WinPE disk
Boot the computer from your WinPE disk (either from the CD or from the USB flash drive) and wait for the command prompt to load.
Formatting the Hard Disk
Next you will need to format the new computer’s hard disk according to your preferences. You can create different partitions using the Diskpart tool for Windows. In this example we will create a small System partition for the Windows 7 boot files and an OS partition to install the operating system. Obviously you can use your own partition preferences instead.
Create the System Partition
Command 1: diskpart
Opens the Diskpart interface.

Command 2: list disk
Displays a list of computer disks.

Command 3: select disk #
Selects the disk number that you want to manage.

Command 4: clean
Deletes all data on the selected disk.

Command 5: create partition primary size=300
Creates a 300 MB primary partition. The number 300 is expressed in MB.

Command 6: format quick fs=ntfs label=”System”
Formats the partition you just created, converts the file system to NTFS and gives it the name “System”.

Command 7: assign letter=S
Assigns the drive letter S (change the S for any you prefer).

Command 8: active
Marks the partition as active.


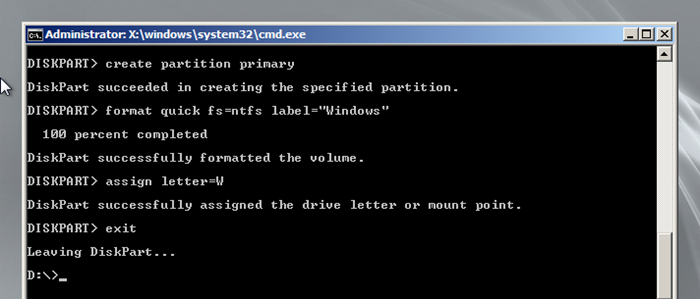
Create the OS Partition
Command 1: create partition primary
Creates a new partition with the remaining space of the hard disk. Otherwise, you can determine exactly the size of the partition by adding the command parameter size = size in MB, as previously mentioned.

Command 2: format quick fs=ntfs label=”Windows”
This formats the partition created in the previous step with the NTFS file system and specifies the name as Windows. Of course, you can change the name (label) of the partition according to your own preferences.

Command 3: assign letter=W
Specifies the drive letter W for this partition. On completion, the Windows installation will automatically be mapped to drive letter C:\.

Command 4: exit
Closes the Diskpart tool.

Other useful Diskpart commands:
Command: list disk
Displays a list of the computer’s disks.
Command: list volume
Displays the partitions of each disk (after selecting the current disk with the command select disk #).
Command: list partition
Displays the partitions of a disk. In order to use this command you must first select a disk with the select command.
Command: select disk #
Selects a disk for further management. Where # is the number of the disk that you want to select. The command list disk helps you choose the right drive.
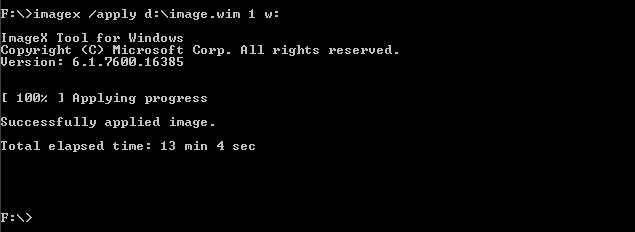
Install the Windows 7 Image
Next we need to install the image file (.wim), which we stored on an external hard drive (it can also be stored on a network location. The command to do this is as follows:
imagex /apply d:\image.wim 1 w:
![]()
General command syntax:
imagex /apply wim-image index destination-drive
Where:
/apply: Ensures the installation of the image on the disk. d:/image.wim: This is the exact path to the image stored on the external drive.
Parameter 1: is a marker for the position of the image file if you incorporate more than one version of Windows 7.
W: The drive partition that you created for your Windows installation.
Fixing the Windows 7 Boot Files
After you have installed the Windows 7 image, you will need to fix the boot files for them to initialize and operate without any problems.
The following command will copy the default boot files from the Windows partition to the System partition you created earlier, with the help of the bcdboot.exe tool.
W:\windows\system32\bcdboot.exe w:\windows /s S:

Alternatively, if the command prompt shows the disk W: you can use the tool bcdboot directly, bypassing the exact location.
bcdboot w:\windows /s s:
Where w:\ is the path to the fresh installation of Windows 7 and s: the System partition.
After you run the command you’ll see a message that the boot files have been successfully created. If you have trouble booting the operating system you can repair your installation using the Windows 7 DVD.
The process is now complete. You can disconnect the external hard drive with the image of Windows 7, your WinPE CD, and reboot your computer. After restarting Windows will continue the OOBE (Out-of-box experience), allowing you to adjust the operating system to your preferences (computer name, user account creation, date, network settings, etc.).
Immediately after you restart your computer with the original settings and image updates that you applied, the following screen will be displayed.
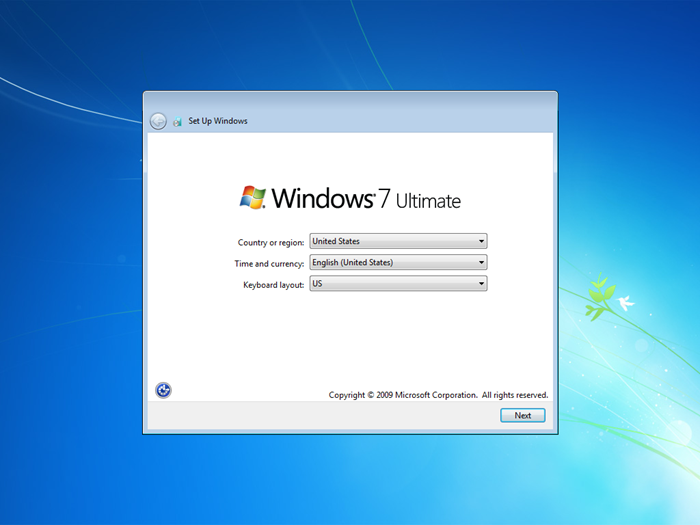
Select the country, region, time, currency and keyboard layout according to your preferences and click the Next button to continue.
Now enter a username and a computer name:

Now create an account password. If you don’t wish to use an account password, you can leave the password fields blank and simply click Next.

Tick the I accept the terms option and click the Next button to continue.

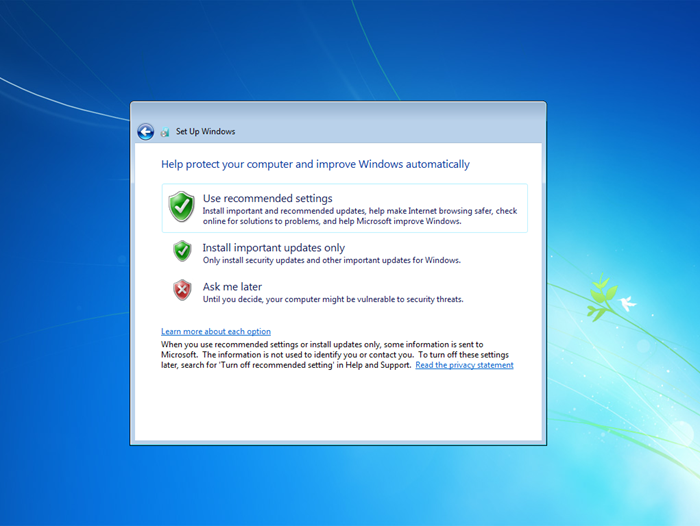
At this point you can set Windows Update to install any outstanding updates on your computer. You can skip this step by clicking Ask me later.
Next, set the correct time and date on your computer and again click the Next button to continue.

As long as your computer is already connected to the network, select the appropriate type of network you see in the image below to apply automatic settings.

This completes Windows configuration and your desktop will shortly load.

Finally, log into the account you created in the previous step and your computer is ready for use.

Refresh the System Image
Over time it is inevitable that you will need to refresh your basic deployment image with available updates from Windows Update and the latest versions of the applications you use in your business.
Although time-consuming, regularly renewing the system image can pay dividends in the long run. The standard process is to install Windows 7 on a test computer using the image file we created earlier, then install your updates and create a new image using the Sysprep method.
You have now completed the process to prepare a reference Windows 7 build which can be deployed on computers across your organisation – steps that will significantly reduce the transition time and effort from moving Windows XP to Windows 7.


