Sysprep is Microsoft’s System Preparation Tool for Windows operating system deployment. It is used to prepare an operating system for cloning and restoration via a disk image. There are two ways to carry out the Sysprep procedure on a computer, either from the outset when you install Windows 7 by entering audit mode or on a system that is already running.
If you’re creating a new image of Windows 7 from scratch, it would be a good idea to start preparing the system directly from Audit mode to avoid any problems.
Audit Mode
Go ahead and install a clean copy of Windows 7 on your reference PC from scratch. Once the installation of Windows 7 completes, wait until the first screen of the OOBE (Out-Of-Box Experience) appears which will ask you to enter the computer’s name. Caution, do not enter and do not press the Next button (Next) yet.
In this screen, press the key combination Ctrl + Shift + F3.

Immediately after this key-press, the computer restarts automatically and logs into Windows 7 with the Administrator account.
Note: When you enter Audit mode your will remain in the same status (audit mode) automatically even after multiple restarts when installing updates and applications. The Audit mode is exited with the shutdown process through Sysprep.
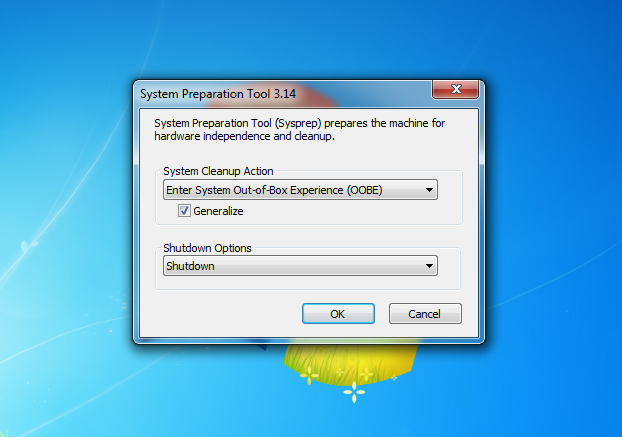
The Sysprep window will appear automatically on the desktop, which will allow us to complete the system preparation process. For now and until you complete the final image of the operating system, you will not need it so choose Cancel to continue.
Now you can install all updates, applications and anything else you want to have pre-installed on the Windows 7 deployment image you create.
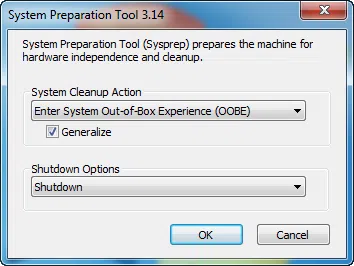
After completing the installation, open the System Preparation Tool window and select Enter System Out-of-Box Experience (OOBE) from the dropdown menu. Directly below, make sure the Generalize option is enabled.
Finally, in the Shutdown Options drop-down select Shutdown and click OK to complete the process.
Windows 7 will perform certain tasks automatically for the Sysprep process and then shut down the computer.

A problem / error that often occurs during the procedure is due to the Windows Media Player Network Sharing Service that is enabled by default in Windows 7. For this reason, it is advisable to disable this service before completing the final process of Sysprep.

Note: If you accidentally close the Sysprep dialog, by pressing Cancel, you can get it back on track by opening the executable file sysprep.exe that you will find in C:\Windows\System32\Sysprep\ sysprep.exe.
Caution: Do not open your computer again until you have prepared for Sysprep because this act will undo all of the configuration and you will need to repeat the Sysprep process from scratch, as described previously.
Using Sysprep in an Existing Installation
As long as you know that a computer with Windows 7 has all available updates, applications, and everything’s working, you can use Sysprep any time.
What you need to do is open the executable file sysprep.exe that you will find in C:\Windows\System32\Sysprep\ then select the appropriate settings as described above.
This process is used mostly in cases where we want to create an updated Windows 7 image with additional updates installed and customizations made compared to the previous image. That is, you apply the existing image on a computer, install all new updates / applications and then execute the system initialization process (Sysprep) to create the updated image.


