As long as you are in such a targeted article, it means you already know what the Read-Only Domain Controller (RODC) is, so I will not extend to this piece at all. Let’s go to the game.
There are two ways to install an RODC, either using the classic installation procedure or using the Staged deployment that we will go into further detail below. In fact, what we do is to prepare (pre-create) the RODC we are going to deploy to a branch office on our own behalf (eg as the admins in a central office) and then to have the RODC implemented on the branch office by an IT person with the appropriate rights (delegated admin).
Before proceeding, it would be good to prepare some things like creating the appropriate groups, users and computers that will be on the branch (in a separate OU of Active Directory, if any) so they are ready for the Password Replication Policy you will create later. Also, it would be nice to create a group of delegated admins who will have access to the RODC and will actually complete the process.
Deploy a Staged RODC on Windows Server 2016
As I mentioned earlier, the process is done from two points. Initially, preparation will be done by a Domain Controller and then completed in the RODC itself. Also, please note below, the RODC should not be joined to the AD domain but in a Workgroup environment. Otherwise, the installation will fail.
On the Domain Controller
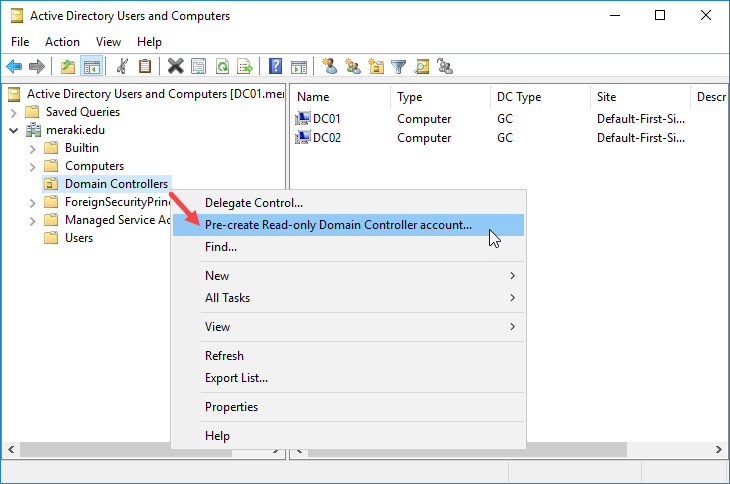
Open the Active Directory Users and Computers console, right-click the Domain Controllers container, and then click Pre-create Read-Only Domain Controller account.
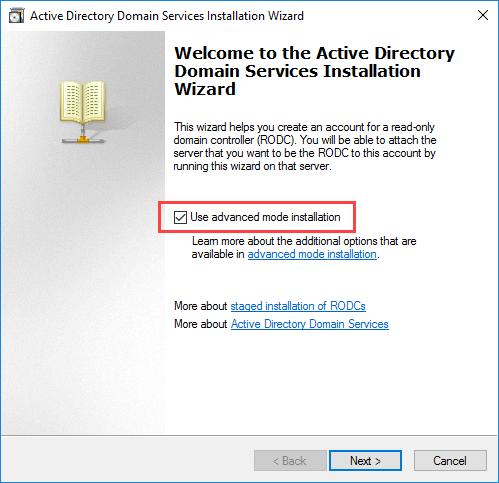
In the wizard window that opens, enable Use advanced mode installation and click Next to continue.
Identify the credentials of the account you will use, in this case, I am connected to a Domain Administrator account, and click Next to continue.
Here, type the Windows Server computer name that will have the role of RODC and click Next to continue. Ensure that the name is exactly the same as this will make the correlation. Also, as I mentioned earlier, the ‘soon-to-be’ RODC should not have joined the domain yet.
Select the Site from the list and click Next to continue. In this case, there is only the Default-First-Site-Name, in your case, there may also be the Branch Site.
Select whether the roles of DNS and Global Catalog will be installed on RODC and click Next to continue. At this point, it will check for proper communication with DNS servers. If communication is not reached then it will show you a corresponding message, but it lets you move on. However, you should resolve any such problem before you proceed.
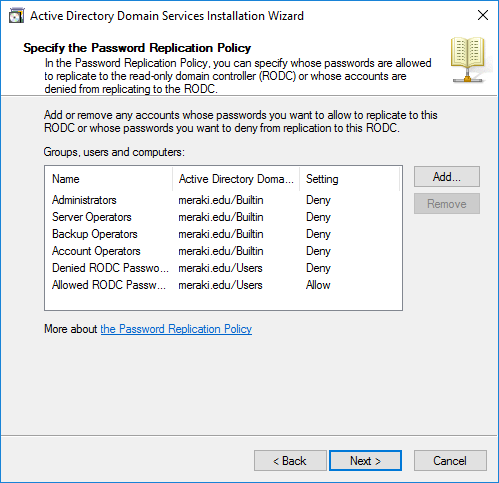
At this point, you will need to select the groups, users, and computers that will participate in the Password Replication Policy. As you will see, high-level accounts are blocked (deny) by default. A typical solution is to create the corresponding items (groups, users, etc.) for that branch and declare them only in Allow setting.
Of course, deny refers to whether it will cache the accounts in the RODC and not whether the account can access the server.
By clicking the Add button you can add the groups, users, and computers you want. As you will see, before choosing them, you have to decide whether to create an Allow or Deny setting for each object.
Even if you are wrong at this point, you can obviously change these settings later on.
In the next step, you will need to select the group or user who will have the delegated right to install and manage the RODC. It is important to declare a separate group or user as this account will need to register in the next step to the RODC itself to complete the installation.
Here is a summary of the settings you have selected and you are given the option to export the settings (for future use and automation) by clicking the Export settings button. Click Next to continue.
Finally, click Finish to finish the ‘pre-create’ wizard.
As you will see in the Active Directory Users and Computers window, in the Domain Controllers container, the RODC has now been added to the Unoccupied DC Account type.
On the RODC
We have completed the process from the Domain Controller. Now, sign in to the RODC. I remind you that RODC has not yet joined the domain, this will happen automatically in the next steps.
First, we will need to install the Active Directory Domain Services role. This can be done either using Server Manager as shown in the steps described in the previous article or using the PowerShell that we will see below.
In a PowerShell window with Administrator privileges, type the following command to install the Active Directory Domain Services role.
Install-WindowsFeature AD-Domain-Services -IncludeManagementTools -IncludeAllSubFeature<pre lang="powershell"> |
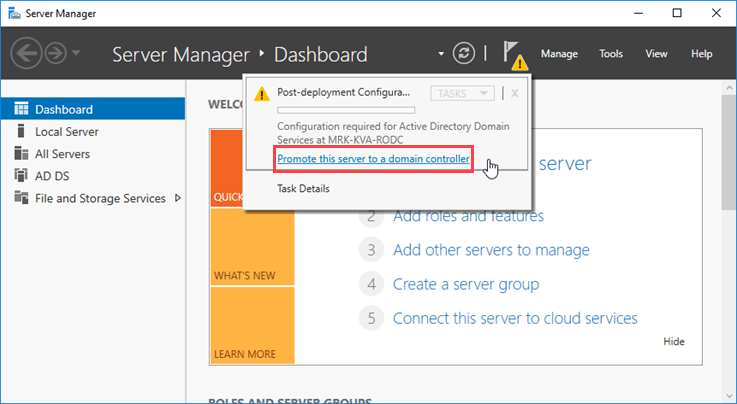
Role installation does not require a restart, so open Server Manager and click Promote this server to a domain controller from the notification flag.
In the Deployment Configuration window, click Add Domain Controller to an existing domain, type or select the domain and the user account (that belongs to the delegated group that you previously stated) to use for this process.
In the Domain Controller Options section, and if you have correctly named the server’s computer name, A pre-created RODC account that matches the name of the target server exists in the directory message appears. Select Use existing RODC account, enter the DSRM password, and click Next to continue.
In the Additional Options section, you can select from which Domain Controller to replicate to the current DC. If you do not have a specific reason, leave the default Any domain controller and click Next to continue.
In the Paths section, choose where the NTDS, SYSVOL, and LOG folders will reside on your server. In our case I will leave the default ones, you can choose another disk based on your preferences and setup.
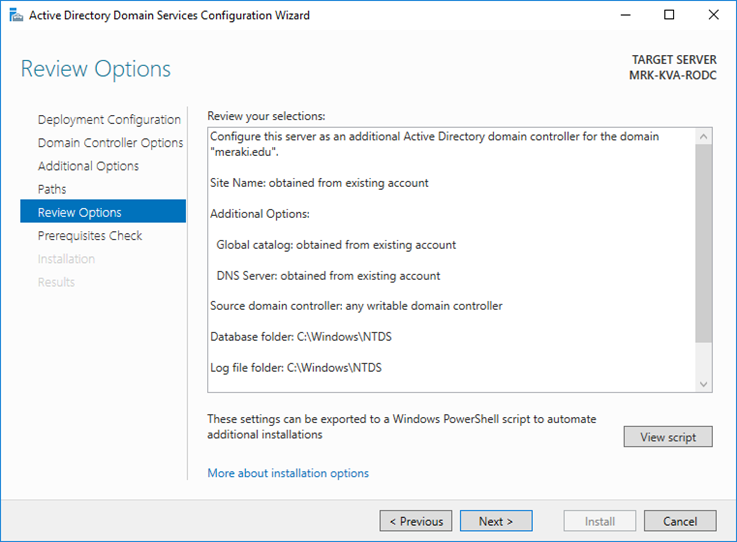
In the Review Options section, you will see a summary of the settings you have selected. Once you’re sure you have not made a mistake, click Next to continue.
In the Prerequisites Check section, the prerequisites will be checked. Here, if even one error occurs, then you will not be able to continue and you will need to fix it before proceeding. Otherwise, if only warning messages are displayed but the check has ‘passed’ as shown in the picture, click the Install button to proceed.
Upon completion of the installation, the server will automatically reboot and your new RODC will be ready.
