In today’s article, we will look at how to perform the Backup and Restore process of a DHCP Server 2016 using the graphical interface, command line and PowerShell.
Before we start, you should know that there are several ways to backup the settings of a DHCP Server such as Scopes, Server Options, Leases, etc., either individually or globally. In the following steps, I will focus more on the globally backup and restore process.
Also, Backup and Restore are only used between the same versions of Windows Server. For example, when you back up from one Windows Server 2012 machine to restore on another or the same Windows Server 2012 machine, as in a case where the server is corrupted. Instead, if you want to back up, for example, from a Windows Server 2012 and restore to a Windows Server 2016, then you should use the migration method, ie Export and Import of DHCP Server settings.
In DHCP Server 2016 there are two ways to back up settings, automatic and manual. Let’s look at them a bit more in detail, starting with the backup first and then restoring the DHCP Server.
Automatic backup of DHCP Server
DHCP Server automatically keeps a backup of its settings at C:\Windows\System32\DHCP\Backup every 60 minutes. This location can be changed through the Properties of the DHCP console in order to be saved in another local folder. It is also possible to change the automatic backup interval.
Backup DHCP Server 2016 using the GUI
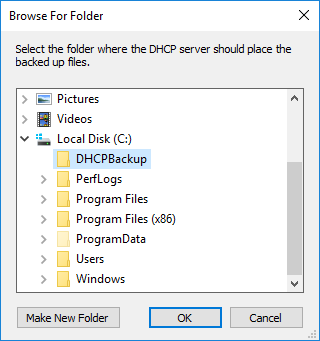
First, create a new folder that will save the DHCP Server backup file. In my case is the C:\DHCPBackup folder.
After you open the DHCP administration console and log on to the server, right-click the server and then click Backup.
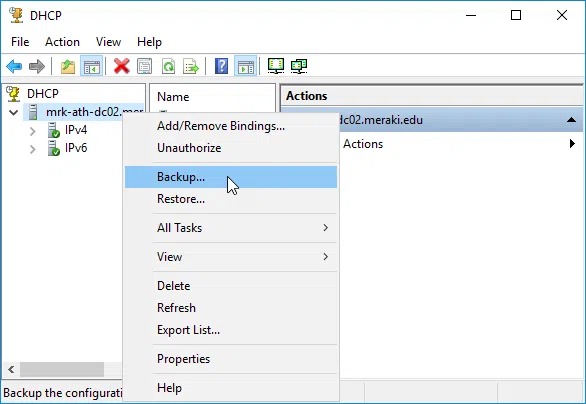
Select the folder you created earlier and click OK to finish the process.
As there isn’t any success message, you should check the folder to confirm that the files have been created.
Restore DHCP Server 2016 using the GUI
Before you start the restore process, you will need to copy the backup folder to the new server. Keep in mind that it should be the same version of Windows Server.
Then, open the DHCP Admin Console and login to the DHCP Server. Right-click on the server and then click Restore.
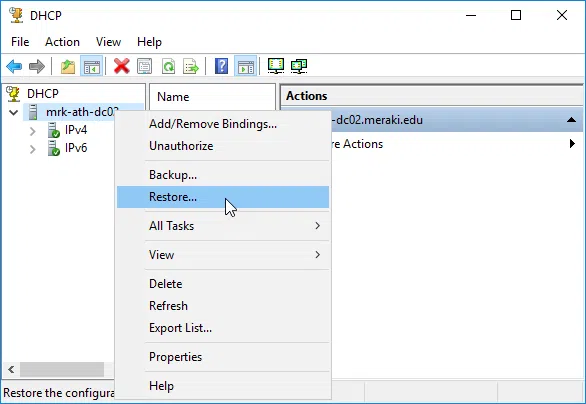
Select the folder that contains the DHCP Server backup, and then click Yes to restart the DHCP service to complete the changes.

Finally, the corresponding message will be displayed.
Backup DHCP Server using Netsh tool
The process is similar to the one before, except that we will use the command line this time, namely the netsh command.
Open the command line with administrator privileges and type the following command.
netsh dhcp server backup C:\DHCPBackup |
Where C:\DHCPBackup, replace with your own folder that you created on the server with your backup files.
Restore DHCP Server using Netsh tool
After you move the folder to the previously created DHCP Server backup, open the command line with administrator privileges and type the following command.
netsh dhcp server restore C:\DHCPBackup |
Where C:\DHCPBackup, replace with your own folder that you created on the server with your backup files.
Backup DHCP Server using PowerShell
Similarly to the command line case, we will use PowerShell here. Open a new window with administrator privileges and type the following command.
Backup-DhcpServer -ComputerName "DC01" -Path "C:\DHCPBackup" |
Where in the -ComputerName parameter replace the name of the DHCP Server and the -Path parameter, type your own backup folder.
Restore DHCP Server using PowerShell
Respectively, after you have copied the backup files folder to the new server, open PowerShell with administrator privileges and type the following command.
Restore-DhcpServer -ComputerName "SRV" -Path "C:\DHCPBackup" |
Where in the -ComputerName parameter replace the name of the DHCP Server and the -Path parameter, type your own backup folder.


