After you have set up your first DHCP Scopes, the next step is to configure DHCP Options. What does this mean; Simply put, you set what the individual options of a DHCP client, such as Gateway, DNS, etc., will be when it receives an IP address.
DHCP Options can be configured at two different levels: Server and Scope.
Configuring DHCP Options at the Server level means that all DHCP clients will have the same options regardless of the Scope they belong to. Correspondingly, by adjusting them to the Scope level, then we can have different options for each Scope separately. How you handle it is purely a matter of your infrastructure needs.
Note that if you have configured DHCP options at both Server and Scope levels, the Scope options on the clients prevail.
Generally, setting up Server and Scope Options is a very easy and simple task. Let’s see how it works.
Configure DHCP Options at Server level
In the DHCP console, expand IPv4 and find the Server Options folder. Here, you’ll see all the settings you’ve already added at the server level.

To add a new option, right-click Server Options and then click Configure Options.
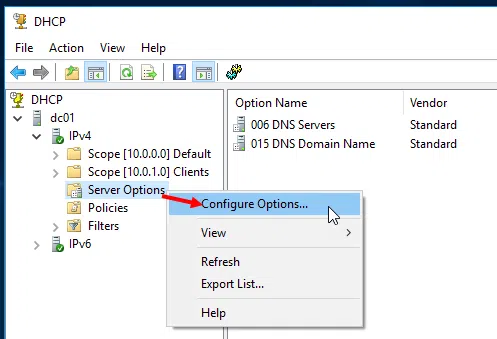
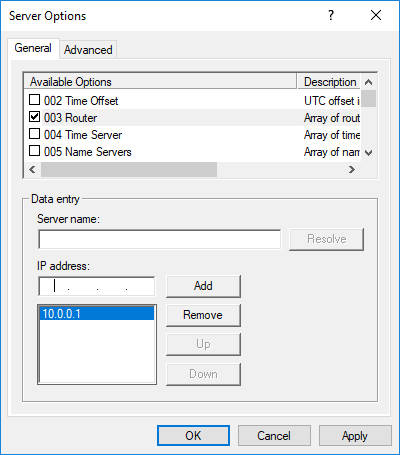
In the window, check one or more options and specify its value in the Data entry box. For example, the following figure shows the addition of the Router.
Configure DHCP Options at Scope level
From the same DHCP console, expand a Scope and go to the Scope Options folder where you will find all the options you have set for this Scope.
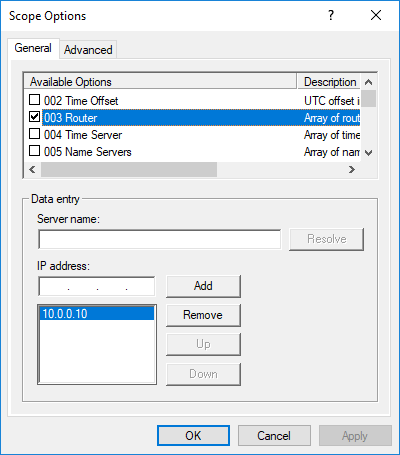
To add a new option, right-click Scope Options and then click Configure Options.

Here, like before, you can add new options by typing what you want and then adjusting the individual parameters in the Data entry box.
Note that Scope Options can be configured directly even when you create a new DHCP Scope as we saw in a previous article.
Configure Server and Scope Options using PowerShell
To configure both Server Options and Scope Options, use the Set-DhcpServerv4OptionValue cmdlet. It is a good idea to take a look at Microsoft documentation, as I will just mention two typical examples below.
To configure DNS Server, DNS Domain, and Router values at the Server level, use the following command.
Set-DhcpServerv4OptionValue -ComputerName "dc01.meraki.edu" -DnsServer 10.0.0.10 -DnsDomain "meraki.edu" -Router 10.0.0.1 |
To set DNS Server, DNS Domain, and Router values at the Scope level, use the following command.
Set-DhcpServerv4OptionValue -ComputerName "dc01.meraki.edu" -ScopeId 10.0.1.0 -DnsServer 10.0.1.10 -DnsDomain "meraki.edu" -Router 10.0.1.1 |


This a great article thanks for the help!!
We have two DHCP servers(Win2016) configured as Failover load-balanced.
On the secondary server, I noticed that were no Server Options compared on Primary.
Should these Options be set exactly as they are on primary, or is it not necessary?
What is the rule?
Do i have to set the same Server Options on secondary ?