• Contact
  • Homelab
Dimitris Tonias
  • Management
  • Monitoring
  • Cloud
  • Virtualization
  • Networking
  • Productivity
No Result
View All Result
  • Management
  • Monitoring
  • Cloud
  • Virtualization
  • Networking
  • Productivity
No Result
View All Result
Dimitris Tonias
No Result
View All Result

Create, restore and manage snapshots on VMware Workstation

Dimitris Tonias by Dimitris Tonias
September 3, 2017 - Updated on April 21, 2024
in Virtualization
Reading Time: 3 mins read
A A
0
Share on FacebookShare on Twitter

Imagine that you are making a critical change to a VM and destroying everything. The situation is critical. Have you ever done it on a production server? (the question is rhetorical). Now imagine that there is a magic stick and with a “spell” it can restore your system exactly as it was before you make the change.

Welcome to VMware Workstation Snapshots.

The snapshots feature in VMware Workstation is a very useful one that you will be using more and more as you perform your testing in the virtual lab. Why; Simply because it can restore your VM to a previous state (you have chosen) where everything was working properly. It’s something like Windows System Restore but it’s a lot better.

In this article, you will see how to create a snapshot, how to restore to a previous snapshot, and how to manage snapshots in VMware Workstation.

Create a new snapshot

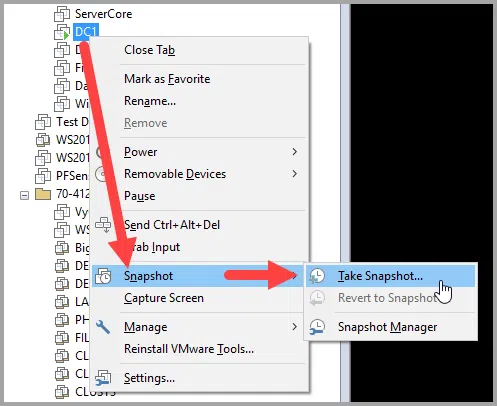
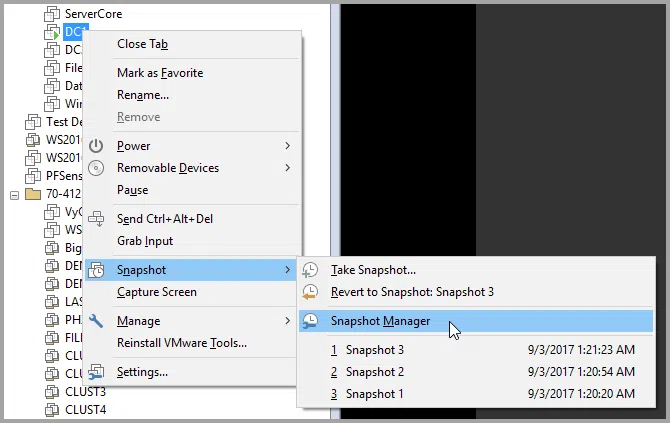
The process of creating a snapshot is pretty easy and fast. At any time, that is when the VM is in operation or not, right-click VM and then Take Snapshot in the Snapshot menu.

Create, restore and manage snapshots on VMware Workstation

Type a name and description for the snapshot you will create, and click the Take Snapshot button to continue. It is a good idea to have the snapshot name and description detailed enough to know the changes that each snapshot contains at all times. It will save you trouble and time in the future.

Create, restore and manage snapshots on VMware Workstation

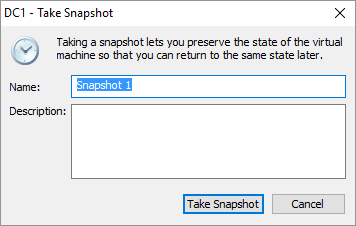
That’s it! Snapshot creation completed.

Restore a snapshot

Since you have created one or more snapshots in a VM, you can now restore them to each one. The process is also quite simple and fast and can even be done while the VM is already in operation.

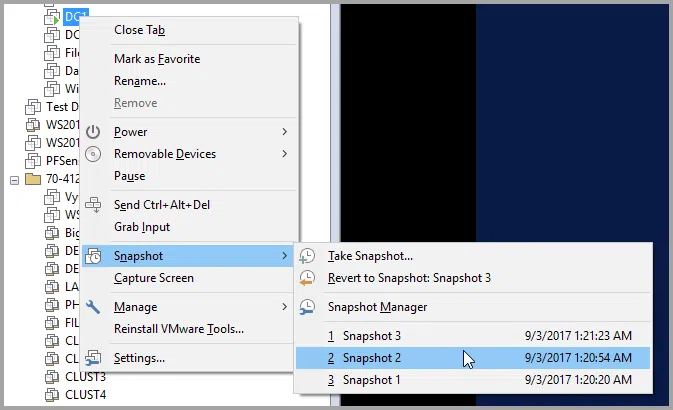
Right-click on VM and then from the Snapshot menu you will see the list of recent snapshots you have saved.

Create, restore and manage snapshots on VMware Workstation

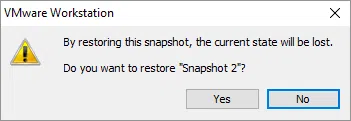
Clicking on a snapshot of the list will prompt you to confirm your selection. Click Yes to continue.

Create, restore and manage snapshots on VMware Workstation

If the VM is in powered on, it takes a few seconds for the restore to complete.

Snapshot Manager

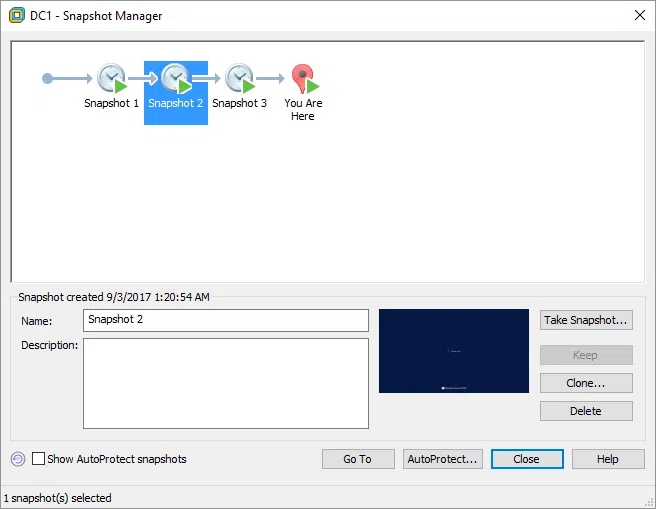
Alternatively, you can open the Snapshot Manager window where you can view all available VM snapshots, create new ones, delete, and restore to a previous snapshot.

Create, restore and manage snapshots on VMware Workstation

As you will see, selecting a snapshot makes enabled the Take Snapshot, Clone and Delete options while displaying the name, description, and screenshot of the screen when the snapshot is stored.

Create, restore and manage snapshots on VMware Workstation

Snapshot files are saved as default to the same folder as the VM. Because they occupy enough disk space, it’s a good idea to create snapshots wisely and to delete what you see fit.

These were the main features of Snapshot capability in VMware Workstation. As you do your testing in the virtual lab, you will find out that this is a very useful feature. If you have not used it so far, I suggest that you start immediately.

Tags: SnapshotsVirtual MachineVMware Workstation
ShareTweetPin
Previous Post

Configure autologin for a Windows VM on VMware Workstation

Next Post

Add a virtual network adapter to a VM on VMware Workstation

Related Posts

Altaro VM Backup Review
Virtualization

Altaro VM Backup Review

Configure dynamic MAC addresses on a Hyper-V 2016 host
Virtualization

Configure Dynamic MAC addresses on a Hyper-V 2016 host

Set static MAC address on a Hyper-V Server 2016 VM
Virtualization

Set static MAC address on a Hyper-V Server 2016 VM

View MAC address of Hyper-V Server VMs
Virtualization

View MAC address of Hyper-V Server VMs

Install Hyper-V Server 2016 as a Standalone Hypervisor
Virtualization

Install Hyper-V Server 2016 as a Standalone Hypervisor

Find which virtual machines use Dynamic Memory on Hyper-V
Virtualization

Find which virtual machines use Dynamic Memory on Hyper-V

Leave a Reply Cancel reply

Your email address will not be published. Required fields are marked *

No Result
View All Result
Zabbix server: More than 75% used in the trends cache
Monitoring

Zabbix server: More than 75% used in the trends cache

In Zabbix, "trends" are a type of data storage representing aggregated historical data. Zabbix monitors and collects a vast amount...

Read moreDetails
Check word count on Google Docs

Check word count on Google Docs

Zabbix server: More than 75% used in the configuration cache

Zabbix server: More than 75% used in the configuration cache

Approve updates in WSUS 2016

Approve updates in WSUS 2016

Configure Group Policy to deploy updates using WSUS 2016

Configure Group Policy to deploy updates using WSUS 2016

Configure computer groups in WSUS 2016

Configure computer groups in WSUS 2016

The initial configuration of WSUS 2016

The initial configuration of WSUS 2016

Get more stuff

Subscribe to our mailing list and get interesting stuff and updates to your email inbox.

Thank you for subscribing.

Something went wrong.

we respect your privacy and take protecting it seriously

  • Contact
  • Homelab

© 2024 Dimitris Tonias

No Result
View All Result
  • About
  • Contact
  • Free Tools
  • Home
  • Homelab

© 2024 Dimitris Tonias

This website uses cookies. By continuing to use this website you are giving consent to cookies being used.