When you connect to a wireless network (WiFi) from your Windows 10 computer then a new profile for each network is created. This includes the network name (SSID) password and additional information about the wireless network.
In Windows 10, your computer will automatically connect to a wireless network (obviously as long as it is in range) based on the highest priority. What does this mean; For example, if you enable the connect automatically option, the network is set to the highest priority.
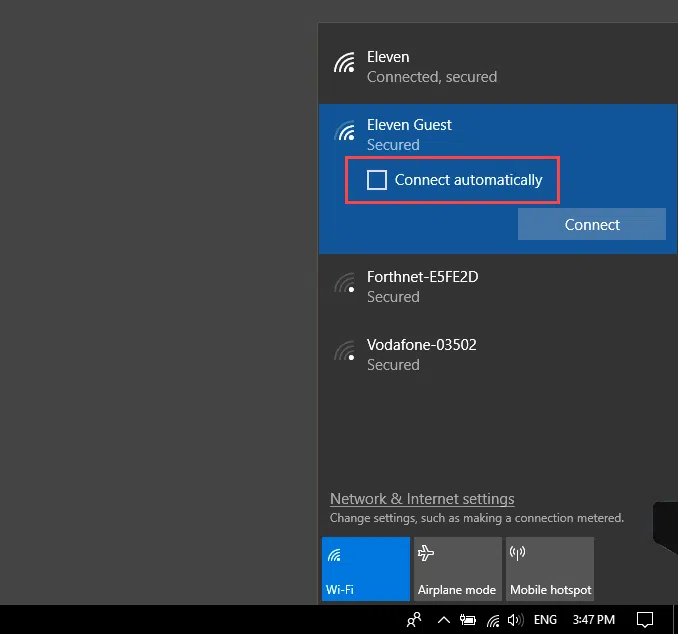
But what if there are more than one wireless networks within the range of your computer and want to choose in which network to connect to? As I said, you have the choice to select only one. The priority of the other networks is internally managed by the operating system, but there is no direct setting that enables us to change it.
The list of available wireless networks reveals the current connection priority for your computer. If a network is unavailable or does not respond, then it will continue to the next one, then to the next, etc.
In today’s article, you’ll see how to change the wireless network priority in Windows 10. This can be done in two ways, either through the command line or through the WLAN10 portable application. For most, WLAN10 will be the easiest solution.
Change wireless network priority using the netsh command
Open the Command Prompt with administrative permissions and type the following command.
netsh wlan show profiles
What this command shows us is the name of the wireless adapter as well as the current list of wireless networks in order of priority. To change the priority on a wireless network you will need this information as you will see below.

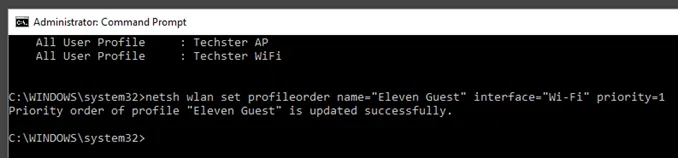
Let’s say we want to change the priority for the wireless network named Eleven Guest and set it to position 1. Type the following command by replacing your own parameters.
netsh wlan set profileorder name=”Wireless Network Name” interface=”Adapter Name” priority=1
The name, interface, and priority parameters are required to execute the command.
In the Name parameter, type the name of the wireless network exactly as it appears in the previous list (eg Eleven Guest).
In the Interface parameter, you type the adapter name (eg Wi-Fi).
In the Priority parameter, enter the wireless network priority number (eg 1).
So, once you set the 1st priority for a wireless network, you can proceed with changing the 2nd priority by typing the above command with the difference that you will now need to change the number in the priority parameter.
For example, the command will be as follows:
netsh wlan set profileorder name=”Eleven Guest” interface=”Wi-Fi” priority=2
Change wireless network priority using the WLan10 tool
If the above steps seem to be incomprehensible, do not worry. It makes sense for the majority of users not to know how to use the command line. But I have an alternative for you.
The WLan10 tool just does the above steps except that everything is done in a graphical environment and does not require any special knowledge to use it. It was designed to solve this problem.
It is a portable application that means you do not have to install it on your computer (just run the executable .exe file) and you can download it for free here. https://github.com/Bertware/wlan10/releases
Opening the application shows the available wireless networks with the current priority. By drag-n-drop, you can easily change the connection priority and also choose whether to automatically connect (Autoconnect) or Autoswitch if a wireless network is no longer available.
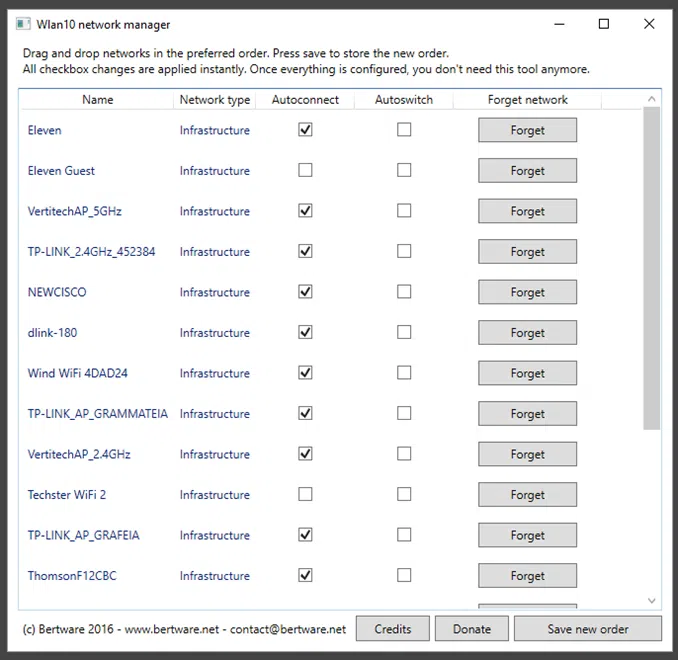
After you set the priority, click the Save new order button to save your changes.
That’s it!
It would be nice to have Microsoft support this feature directly from the graphical interface, maybe we can see it in a future version of Windows. Until then, I hope I helped you understand how to change the priority order for connecting to wireless networks in Windows 10.


